Friday, September 21, 2012

Baby Cot Teething Guard


I've had my Aunts 2nd hand cot in storage for a while so decided to set it up and see what else was required. I'd bought the rag quilt from the MadeIt website as I just loved the colours which have ended up being the theme for my nursery.

I've only got 1 guard made so far but plan to cover the tops of all 4 sides to protect the cot which is in immaculate condition considering it's age. Instructions are below:

Materials:
  • Fabric (I chose 3 different colours from my stash of fabrics - lime green, aqua blue and white).
  • Quilted fabric (for the backing.
Steps:
  1. Measure length of crib. Add 2 inches to the length for the seam.
  2. Repeat for the width by wrapping the tape measure around the rail tightly, then add 2 inches.  NOTE: If you use multiple fabrics like I did, make sure you add extra for the seams.
  3. Cut quilted fabric the exact length and width of the project (eg: don't allow for seams).
  4. If applicable, join your decorative fabric pieces together to make one long fabric strip.
  5. Turn edges over 1cm and iron. NOTE: do the long sides first, then the short ends.
  6. Place decorative fabric and quilted fabric together and right sides facing out.
  7. Fold back the decorative fabric 1cm over the quilted faric to form a hem. Iron and pin in place.
  8. Prior to sewing anything, make and attach the fabric ties which secure the guard to the cot. NOTE: I used ties not buttons for safety reasons but velcro might be another good alternative.
  9. I used 5 ties per side, in the following sizes: 4 x (30cm x 5cm) & 6 x (20cm x 5cm).
  10. Space the ties evenly ensuring you have 1 at each end per side. NOTE: to ensure your ties are pinned in places which fit between the railing of your cot, lay the unsewn guard in place and mark with pins where the best spots for the ties are.
  11. Pin the ties in place tucking underneathe the hem so the tie length hangs towards the middle of the guard.
  12. Top stitch around the entire guard hem at the inner edge of the folded seam (edge closest to the quilted fabric). Backstitch over each tie to provide more strength to the stitching.
  13. Fold ties back on themselves so the length then hangs towards the outside of the guard. Top stitch around outer edge.
  14. Repeat steps for cot short ends - just adjust the length/width as necessary.

Monday, September 17, 2012

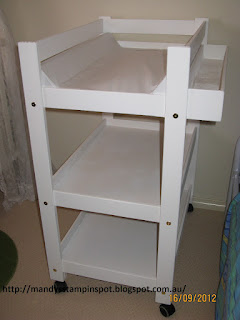
Homemade Wooden Baby Change Table

How awesome is this wooden baby change table?  I just love it.

My clever other half put this together after me giving him a basic brief. I purchased a new mattress which is where he started with the measurements. I'm pretty tall (about 180cms) so the height is just perfect for me. It's made out of pine so it's really light however it's also on wheels. Even with the holder at the side for easy to grab creams, wipes etc still enables it to fit through a standard sized door. He really did think of everything! Love, love, love it!!! Lucky baby nugget.

 Below - this is it all stocked up ready to go. I'll have to get back on the sewing machine to make a removable cover which can be thrown in the wash (just in case).

Stampin Up Bird Punch - Daughters Birthday


A work colleague asked me to make her a card for her daughters birthday. Her daughter loves birds and the colour pink. Knowing immediately it was an opportunity to utilise the very versatile Stampin Up Bird Punch, the creation grew into a bird house. I used a combination of Stampin Up Pink Pirouette, SU Pretty In Pink & SU Regal Rose. I stamped the body of the bird using SU Vintage Vogue stamp set. I will definately be making a few more of these.

Saturday, September 15, 2012

Unisex Baby Burp Cloths

I made the pink baby burp cloths for a friend who has just had a little girl, and made the purple ones for me as I loved the pattern and was the closest to being unisexed colours. Here's how I made them...

Products used:  terry towelling backing, flannel patterned fabric. Note: can also use ribbed chenille as backing.

Steps:
  1. Cut fabric (front and backing) 24cm x 47.5cm.
  2. Place fabric right sides together and pin.
  3. Sew using a 1 cm seam allowance.
  4. Leave a gap at one end (to turn inside out).
  5. Trim corners to cut off corner (eg: cut triangle off)
  6. Turn inside out and push out corners with a pencil or chopstick.
  7. Iron to flatten the edges.
  8. Sew topstitch x 2 around all edges. This not only secures the opening used the turn the burp cloth inside out, but also provides a professional finish. I sewed 2 x topstitches at approx 0.5 and 1cm from edge.

Such a cute, very useful and cost effective gift for a new mummy & bub.

Note: Half a metre of fabric will make 4 x burp cloths.

Idea 1: If using chenille, you can sew together with right sides facing out and cut little slots into the fabric up to the seam line (DON'T cut the seam line!!) to create a ruffled edge. Looks really cute.

Idea 2: If you have an environmentally conscious awareness, or simply don't have any terry towelling for backing, use an old t-shirt before it hits the rag bin or Op Shop bag.

Idea 3: If you want to get a little fancy, rather than sewing a straight side hem, use a large plate or bowl to cut out a section in the middle of the long edge which will taper around your neckline.

Tuesday, September 11, 2012

Christmas Santa Sack

This is the first 'gift' I've made for our growing little baby nugget (now 21 weeks). As we don't want to know the sex, everything I'm making will have to be unisexed. I found the Christmas Owl fabric in the local Spotlight store last week and just had to have it.