Saturday, December 15, 2012

Handmade Christmas decoration - Fabric Bon Bons


Getting into the Christmas spirit yet? If you're lagging a little, these handmade fabric Christmas decorations are sure to change your mood. The added bonus is if you pop into Spotlight now before Christmas, they have all the fabric, ribbons and Christmas decorations on sale for 50% off. Bonus!
 
They are very easy to make and very affordable if you take on board the tip above. Plus if hubby is a hoarder .. raid hubby's stash of goodies in the shed for spray glue, hot glue gun, wire cutters, foam, storm pipe / poly pipe.  I think that was all I managed to acquire but I'll update this post tomorrow (16/12/2012) with the exact items used.

Saturday, November 24, 2012

Baby Nursing/Feeding Cover - Unisexed

This is a nursing/feeding cover I whipped up this afternoon. Took just over an hour so very quick and easy. I followed the instructions on this online tutorial http://madebythemamamonster.blogspot.com.au/2008/04/nursing-cover-tutorial.html

I had seen a few tutorials but I liked this one as it was not only easy to follow, but it has boning in the front section so when feeding, I'll be able to keep an eye on bubba without the world being exposed to anything unnecessary!

The only difference I did from the tutorial was I used 2 fabrics. I'd read some feedback that some nursing mums found the double layer better as it prevented puffs of wind blowing the cover up. My only concern is that it may be a little stuffy for bubba on the real hot days, but I will probably make another one using one layer so I have the option of both (weather dependent!!) :)
 

Wednesday, November 21, 2012

Wedding invites - SU Bird Punch

I made a stack of these invites for my Aunty and her to-be hubby. The actual size of each invite was DL but the photo only shows the very top section as the wording is personal. At the bottom of the invite I punch a decorative border which finished it off nicely. It was a very time consuming and fiddly project - one which I wouldn't repeat if more than 50 invites are required. Having said that, they turned out beautiful and elegant.

Sunday, November 18, 2012

Newborn nappy cover and going home outfit

This is little bubba's outfit it will come home in from the hospital. Less than 10 weeks to go! I bought the romper and socks, but made the matching nappy cover. I also plan on crocheting a little white jacket for cooler evenings out. I'll post that in coming weeks. And possibly matching booties and mittens. I'll see how I go.

However the next priority is getting a start on this years Christmas cards.

Baby Polar Fleece No-Sew Throw Rug

This really is the easiest cheats 'no-sew' rug ever. I saw it in Textile Traders and loved it. Plus there is no sewing involved. The fiddliest part was cutting 2 co-ordinating fabric squares of polar fleece at exactly 1.5m square. I cut a 10cm square from each corner, then marked 3cm wide strips cutting in 10cm. Then just went along and tied the top and bottom strips together.

Would make a great baby or christmas present.  Below is the underside of the rug:

Thursday, November 15, 2012

Christmas present - Owl skirt and top set

I've been busy sewing again, attempting to get organised for Christmas. I'd made this skirt for a niece earlier this year and made another spare to put away for another niece for Christmas. I got busy today and appliqued the matching top. One Christmas pressie completed.


 Above picture: this is a close up of the applique. I used a small bowl to trace an exact circle of the visoflex, roughly cut around outside this border, positioned the visoflex on the pattern fabric, ironed, cut accurately around the circle, peeled off the backing, positioned the fabric on the top, ironed again. I finished off this time sewing a zig zag stitch around the outside of the fabric piece to hold secure.
Above picture: This is a close up of the pleated hem of the skirt. Makes a plain skirt that little bit more fancy.


Tuesday, November 13, 2012

Baby - Newborn Nappy Covers #2

More pressies for bubba.  I used the same nappy cover pattern as per the link posted in the previous post. I cut out a fabric piece capturing a single owl with a generous border, ironed the fabric piece onto visoflex, cut out the single owl with an approx 2mm border, removed the visoflex backing and ironed onto the singlet. I then sewed around the outside of the entire single owl coming in approx 1mm. Normal applique uses a tight zigzag stitch but I just used a normal straight stitch. I'm soooo happy with how they turned out. Can't wait to do some more applique.

Sunday, November 4, 2012

Baby - Unisex Newborn Nappy Cover

I've just started making some of these nappy covers in mainly 0-3month size as when bubba decides to enter the world, the weather will be quite hot still. I'm going to applique a matching singlet/tshirt but just working out the design ... so watch this space.

The pattern & tutorial for the nappy cover was discovered at the website link below, really easy to follow ... http://www.danamadeit.com/2008/07/tutorial-the-perfect-diaper-cover.html


Friday, September 21, 2012

Baby Cot Teething Guard


I've had my Aunts 2nd hand cot in storage for a while so decided to set it up and see what else was required. I'd bought the rag quilt from the MadeIt website as I just loved the colours which have ended up being the theme for my nursery.

I've only got 1 guard made so far but plan to cover the tops of all 4 sides to protect the cot which is in immaculate condition considering it's age. Instructions are below:

Materials:
  • Fabric (I chose 3 different colours from my stash of fabrics - lime green, aqua blue and white).
  • Quilted fabric (for the backing.
Steps:
  1. Measure length of crib. Add 2 inches to the length for the seam.
  2. Repeat for the width by wrapping the tape measure around the rail tightly, then add 2 inches.  NOTE: If you use multiple fabrics like I did, make sure you add extra for the seams.
  3. Cut quilted fabric the exact length and width of the project (eg: don't allow for seams).
  4. If applicable, join your decorative fabric pieces together to make one long fabric strip.
  5. Turn edges over 1cm and iron. NOTE: do the long sides first, then the short ends.
  6. Place decorative fabric and quilted fabric together and right sides facing out.
  7. Fold back the decorative fabric 1cm over the quilted faric to form a hem. Iron and pin in place.
  8. Prior to sewing anything, make and attach the fabric ties which secure the guard to the cot. NOTE: I used ties not buttons for safety reasons but velcro might be another good alternative.
  9. I used 5 ties per side, in the following sizes: 4 x (30cm x 5cm) & 6 x (20cm x 5cm).
  10. Space the ties evenly ensuring you have 1 at each end per side. NOTE: to ensure your ties are pinned in places which fit between the railing of your cot, lay the unsewn guard in place and mark with pins where the best spots for the ties are.
  11. Pin the ties in place tucking underneathe the hem so the tie length hangs towards the middle of the guard.
  12. Top stitch around the entire guard hem at the inner edge of the folded seam (edge closest to the quilted fabric). Backstitch over each tie to provide more strength to the stitching.
  13. Fold ties back on themselves so the length then hangs towards the outside of the guard. Top stitch around outer edge.
  14. Repeat steps for cot short ends - just adjust the length/width as necessary.

Monday, September 17, 2012

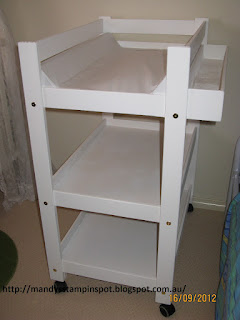
Homemade Wooden Baby Change Table

How awesome is this wooden baby change table?  I just love it.

My clever other half put this together after me giving him a basic brief. I purchased a new mattress which is where he started with the measurements. I'm pretty tall (about 180cms) so the height is just perfect for me. It's made out of pine so it's really light however it's also on wheels. Even with the holder at the side for easy to grab creams, wipes etc still enables it to fit through a standard sized door. He really did think of everything! Love, love, love it!!! Lucky baby nugget.

 Below - this is it all stocked up ready to go. I'll have to get back on the sewing machine to make a removable cover which can be thrown in the wash (just in case).

Stampin Up Bird Punch - Daughters Birthday


A work colleague asked me to make her a card for her daughters birthday. Her daughter loves birds and the colour pink. Knowing immediately it was an opportunity to utilise the very versatile Stampin Up Bird Punch, the creation grew into a bird house. I used a combination of Stampin Up Pink Pirouette, SU Pretty In Pink & SU Regal Rose. I stamped the body of the bird using SU Vintage Vogue stamp set. I will definately be making a few more of these.

Saturday, September 15, 2012

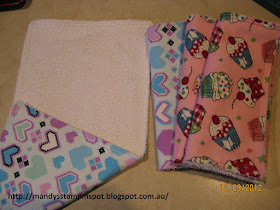
Unisex Baby Burp Cloths

I made the pink baby burp cloths for a friend who has just had a little girl, and made the purple ones for me as I loved the pattern and was the closest to being unisexed colours. Here's how I made them...

Products used:  terry towelling backing, flannel patterned fabric. Note: can also use ribbed chenille as backing.

Steps:
  1. Cut fabric (front and backing) 24cm x 47.5cm.
  2. Place fabric right sides together and pin.
  3. Sew using a 1 cm seam allowance.
  4. Leave a gap at one end (to turn inside out).
  5. Trim corners to cut off corner (eg: cut triangle off)
  6. Turn inside out and push out corners with a pencil or chopstick.
  7. Iron to flatten the edges.
  8. Sew topstitch x 2 around all edges. This not only secures the opening used the turn the burp cloth inside out, but also provides a professional finish. I sewed 2 x topstitches at approx 0.5 and 1cm from edge.

Such a cute, very useful and cost effective gift for a new mummy & bub.

Note: Half a metre of fabric will make 4 x burp cloths.

Idea 1: If using chenille, you can sew together with right sides facing out and cut little slots into the fabric up to the seam line (DON'T cut the seam line!!) to create a ruffled edge. Looks really cute.

Idea 2: If you have an environmentally conscious awareness, or simply don't have any terry towelling for backing, use an old t-shirt before it hits the rag bin or Op Shop bag.

Idea 3: If you want to get a little fancy, rather than sewing a straight side hem, use a large plate or bowl to cut out a section in the middle of the long edge which will taper around your neckline.

Tuesday, September 11, 2012

Christmas Santa Sack

This is the first 'gift' I've made for our growing little baby nugget (now 21 weeks). As we don't want to know the sex, everything I'm making will have to be unisexed. I found the Christmas Owl fabric in the local Spotlight store last week and just had to have it.

Tuesday, August 21, 2012

Punch Art Giraffe Name Tag

This is my punch art name tag to be used this weekend at the Stampin Up Regionals in Perth, Western Australia.

The giraffe was made using the Stampin Up Owl Punch and the leaves came from the SU Bird Punch. I've made a few extras to make some cards with the spare giraffes.

Saturday, August 18, 2012

Baby Dragon Punch Art

 Wow it's been a loooong time between posts! Sorry! I'm off to the Stampin Up Regionals in Perth, Western Australia this weekend and needed to make some card swaps. Being 17 weeks pregnant with my first child, I had baby on the brain. I'd seen this cute Baby Dragon idea before (sorry to the original designer as I can't remember where I saw it to credit / link etc) and thought it would be perfect. They are quite fiddly when making so many multiples like I have but I loved the outcome. I'll just have to be very selective who I swap with as I don't have as many as I'd hoped. I also decided to keep a couple as I have a couple of friend due to give birth next week!

I just sponged the background dots in coordinating inks to ensure the colours matched perfectly to the cardstock.
Products Used:
Background cardstock: Stampin Up Baja Breeze & Pretty in Pink
Patterned Card: SU Whisper White cardstock sponged with Baja Breeze or Pretty in Pink & Mellow Moss ink using daubers.
Baby Dragon: SU Wild Wasabi & Garden Green, Whisper White & Basic Black cardstock.
Punches:  All punches used were Stampin Up - Boho Blossoms, Large Oval, Extra Large Oval, 1/2" Circle, 1 3/8" Circle (used to cut out mouth then sanded sharp corners to round off), Love heart from the Bird Punch.
Extras:   Double-sided tape, SU Dimensionals (mounting block), daubers, multipurpose liquid glue, scissors, black pen, white gen pen.

Saturday, May 12, 2012

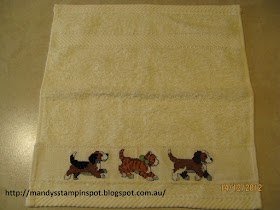
Sewing - Hanging Hand Towel

I've been wanting to make these hanging hand towels for a while now (since I spotted them on this website ... http://kleiosbelly.wordpress.com/2010/01/04/christmas-prezzies-6-1-for-you/) and happened to spot these cute tea towels in Spotlight the other day. The intention was to make a couple for Mothers Day, however I hung this one up in my kitchen to take a photo, now I just can't bear to take it down. Think I'll have to make some more and pop them away in the present cupboard for Christmas!

 
The possibilities really are endless as I also saw some plain coloured towels (with no pattern/design) which had a matching strip of fabric along the bottom. This added that extra splash of colour which was needed to give another point of interest. What a great gift for someone who is hard to buy for!!

Friday, May 4, 2012

Male card - masking leaves

If you want an extremely easy and quick male card which uses very little craft supplies, this card is perfect. I saw it on Leonie Schroder's blog http://www.stamp-a-latte.com/?s=masking, loved it so copied it almost exactly as I didn't have the same stamps. It looks much better in real life. I'm going to do a few more in blue and brown tones.

I just used three scrap pieces of paper and held in place with a very small amount of double sided tape on the plain white card stock. Then using daubers I sponged SU Always Artikoke and SU Mellow Moss to a desired colour strength. I then removed the scrap paper and stamped the leaf images as desired and finished off with the birthday saying.

Products used: leaf stamps are non Stampin Up; birthday saying is from the SU Upsy Daisy stamp set; SU Always Artikoke & Mellow Moss stamp pads; white card stock.

Tuesday, May 1, 2012

Stampin Up - A Rose Is a Rose - 70th Birthday Card


Products used:  Stampin Up A Rose Is A Rose stamp set; SU Sale-a-bration Bliss stamp set; SU French Script stamp; Pink Pirouette, Pretty In Pink, Rich Razzleberry, Mellow Moss & Always Artitoke ink pads.

CASED from http://clairedaly.typepad.com/sisterhood_of_the_travell/2010/06/vintage-a-rose-is-a-rose-.html

Sunday, April 29, 2012

Stampin Up Punch Art Crab

I've just spent the weekend in Toodyay at a Stampin Up Craft Camp where we made heaps and heaps of projects. The last project was where we were given a sketch and had to come up with our own design. As I'm from Mandurah, famous for the yummy Mandurah estuary crabs, this is the card I came up with. I'll probably change the mouth as it was a rush job to finish and the mouth isn't how I wanted. Apart from that, very happy with my design.

Tuesday, April 17, 2012

Stampin Up Bird Punch - Wedding card

Isn't this gorgeous! It's CASED from the very talented Teneale Williams (http://tenealewilliams.com.au/2010/09/no-longer-an-inkspiration/) however I added a little splash of purple colour. It's not hard to make something look stunning with this Stampin Up Bird Punch.

Wednesday, April 11, 2012

Stampin Up Illuminations Gift Voucher Holder

As mentioned in the last post, my twin Aunts are turning 50 so as we have organised a gift voucher that came in a daggy plain envelope, I made these Gift Voucher Holders using Stampin Up Illuminations stamp set, SU Riding Hood Red, Pink Pirouette and Whisper White cardstock, SU Riding Hood Red inkpad and Stampin Up Bella Rose DS Paper. Lucky for me my Aunts names start with 'J' and 'C' so this stamp set was perfect utilising the 'Joy' and 'Cherish' stamps.

To retain the 'J' and remove the remainder of the wording in 'Joy' I had two attempts. In the first attempt (which didn't work for me) I stamped the entire stamp, then tried to remove the 'o' and 'y' with a cotton wool bud. But when stamped the outline of the letters remained albeit very faintly. So the second attempt (which worked great) was I placed sticky tape strategically over the unwanted letters, stamped the entire stamp, removed the sticky tape and it stamped perfectly.

Tuesday, April 10, 2012

Quilled 50th Birthday Card easel card

My twin aunts are turning 50 this week so I wanted to make their 50th birthday cards extra special. This is what I came up with. One down, one to go! It's lucky they only turn 50 once as I'll definately think twice about attempting this card design again ... it took hours!!

Saturday, March 31, 2012

Sewing - Girls ruffle skirt with matching bag

This is an outfit and matching bag that I made for my niece who just turned 5 years old. NOTE: I DIDN'T DO THE APPLIQUE. I purchased that lovely appliqued t-shirt off a wonderful Australian handmade website where crafty people sell their wares ... site is called MadeIt (http://www.madeit.com.au/). \

So ... the t-shirt got me all inspired to sew. Whilst searching the internet for a ruffle skirt tutorial I also stumbled across the bag tutorial which I knew I just HAD to make too. After all, what's an outfit without a handbag?? I'm planning on making a few more of the bags in various sizes (probably without the drawstring insert section for storage bags in my craft room. No doubt I'll post these at a later date so you can see my new sewing obsession creations!

Tuesday, March 13, 2012

Sewing - Baby Bib & Baby Burb Cloth set with matching card

How cute is this fabric? I knew it was perfect for the sewing project I had in mind. Friends have recently had a little baby boy and girl so I wanted to give a more personal pressie by making something. The only criteria - it had to be a simple project as I don't sew very much and can't read sewing patterns, and it had to be useful. I started with the baby bib, then added to the set with the baby burb cloth using the matching fabric with terry towelling on the back. There are lots of different patterns/tutorials/designs on the internet.
This matching card was made using the Stampin Up Lucky Duck stamp set and various papers in my craft stash. These 2 baby cards were inspired by LeeAnn Greff at http://flowerbug.typepad.com/my_weblog/2011/02/little-duckie-punch-art.html
Above: Baby boys bib.
Above: Baby boys burb cloth.
Above: Baby girls bib and baby nappy and wipe wallet. The strap has a piece of velcro so the thickness can be adjusted depending on how many nappies are in the wallet and the thickness of the wipes case.
Hope they like them! :)